To create vector features in the GISLayer Software, the Layer Box should have a vector layer.
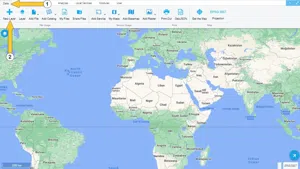
If you don’t have a vector layer Click on Data -> New Layer buttons to open panel and create a new layer using this panel.
The following screenshot shows the position of the Create Vector Layer Panel.
Step 1: Activating the Vector Layer
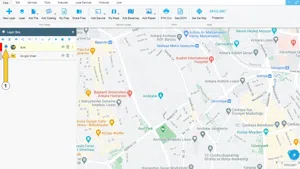
The vector layers that you create within the GISLayer Software or insert into the map using files are also layers that enables you to create and edit. To work on a layer, you must first activate the layer. For this, the radio button next to the layer name should be selected and the layer should be activated.
The following screenshot shows the location of the radio button.
Step 2: Enable Editing on Vector Layer
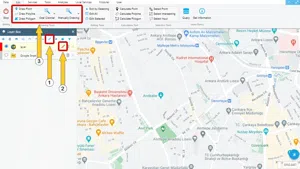
To enable editing of a vector layer in the GISLayer Software, click on the pencil icon in the top button group of the Layer Box panel. A click on the pencil icon will show the pencil icon in the right button group of the corresponding layer. Simultaneously, the Edit menu opens, which also contains drawing tools, and the layer can now be edited. If the active layer is defined as;
- Polygon, polygon features can be created and edited
- LineString, line features can be created and edited
- Point, point features can be created and edited
- Geometry Collection, all types of features can be created and edited
The following screenshot shows the active edit mode of the layer after numbered steps.
Step 3: Introducing the Drawing Tools in the Edit Panel
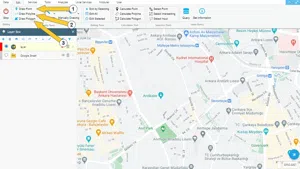
After you have enabled editing in the GISLayer Software, the Edit panel will open automatically. In this panel there are 3 main geometry types to create. These are Point, LineString and Polygon.
The following screenshot shows the locations of these tools.
The properties and use of the respective tools are described below.
- Add Point: After clicking Add Point button, user will be able to add points on the map and every click on the map will be added to your layer as a point. At the end of the process, there are 2 methods for the user to complete the drawing. These;
- By clicking Stop Editing button located in the upper left corner of the “Edit” panel.
- By selecting “Stop Editing” in the menu that appears after a mouse right click
Executing one of these 2 options ends the editing.
- Draw Line: After clicking Draw Line button, user will be able to add line. For the user there are 3 options to stop editing. These are;
- By clicking on the last point of the drawing
- By clicking Stop Editing button located in the upper left corner of the “Edit” panel.
- By selecting “Stop Editing” in the menu that appears after a mouse right click
Executing one of these 3 options ends the editing.
- Draw Polygon: After clicking Draw Polygon button, user will be able to add polygon . For the user there are 3 options to stop editing. These are;
- By clicking on the first added point again
- By clicking Stop Editing button located in the upper left corner of the “Edit” panel.
- By selecting “Stop Editing” in the menu that appears after a mouse right click
Executing one of these 3 options ends the editing.
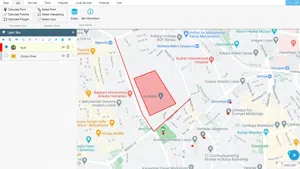
The following screenshot shows examples of vector features.


Related Documents