The application means marking certain points on the ground. A feature has been developed to help find these points.

Admin 10.03.2020 Category : BlueGIS Mobile Education Documents

The application means marking certain points on the ground. A feature has been developed to help locate these points.

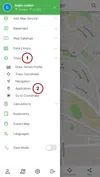
An application can be made in BlueGIS software. The application panel can be accessed with the "Application" button under the "Tools" in the left menu.

Application

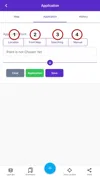
Step 1: Choosing an Application Point

First, determine the application point in the application panel. The application point can be determined by 4 different methods.

1. Location: The user's current location is taken

2. From the map: Point is selected on the map

3. Search: Searching for the place with search panel

4. Typing: Enter coordinates of the point manually

Application

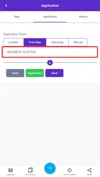
After the point selection is completed, the point information will appear in the box below.

Application

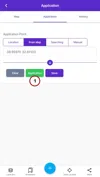
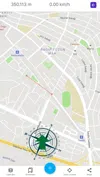
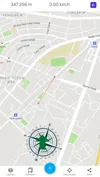
Step 2: Starting the Application

To start the application, click on the Application button after selecting the point.

Application

After starting the application, the line to be followed appears on the map. There is also a compass and a green arrow on the map. The application point can be easily accessed by following the green arrow. You can see how many meters are left to the application point on the screen.

Application

Step 3: Saving the Application Point

Application points can be saved. Thus, when another application is required at that point again, the application process can be easily applied.

Press the Save button to save.

Application

After clicking the 'Save' button, enter a name.

Application

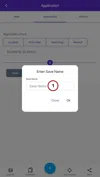
The save process is completed by pressing the OK button.

Step 4: Listing Saved Points

Click the history menu in the application panel to list the saved points.

Application

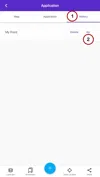
Here, the saved application points are listed. There are delete and go buttons next to each saved point. Records can be deleted with the 'Delete' button. The application can be restarted for the selected point with the Go button.

Application

Related Documents

Other Documents

Creating Vector Layer
Spatial Data Uploading
Upload Multiple Spatial Files
Layer Box Usage

4-Layer Box Usage

10.03.2020
Attribute Table and Features
Feature Attribute Table - Operations
Attribute Table - Text Queries And Spatial Queries
Drawing New Feature
Downloading Layer
Labels

10-Labels

10.03.2020
Z-index Replacement
Adding WFS Service
Adding WMS Service
Adding WMTS Service
Adding WFS-T Service
Adding XYZ Services
Adding PBF Service
Add Vector Tile

18-Add Vector Tile

10.03.2020
Adding Street Basemap
Adding Satellite Basemap
Adding Special Basemaps
Add Catalog

22-Add Catalog

10.03.2020
Create A Catalog File
List Catalogs

24-List Catalogs

10.03.2020
Re-Adding Previously Added Layers
Filtering With Overpass API
Creating Elevation Profile
Coordinate Tracking
Navigation

29-Navigation

10.03.2020
Application

30-Application

10.03.2020
Length Measurement
Area Measurement
Coordinate Conversion
Point Creation Using Slope And Distance
Bearing And Length Calculation
Bookmarks

36-Bookmarks

10.03.2020
Printing Out The Map
Changing The Language
Night Mode

39-Night Mode

10.03.2020
Changing Basemap
Creating Point By Clicking The Map
Height Measurement
Saving System File
Listing System Files And Adding To Map
Sharing System File
Displaying Shared Files And People
Adding Sharing File To The Map And Stop Sharing
Adding Shared File To The Map And Stop Sharing
Add, Edit, Delete Geometry in Real-Time
Sending Back System Layers Changes
Displaying Log Table
Listing Maps Shared With Everyone
Displaying Available GISMoney
Sign In

54-Sign In

10.03.2020
System Settings

55-System Settings

10.03.2020