With the WMS service, it becomes possible to share data over servers as image files. BlueGIS offers this possibility.

Admin 10.03.2020 Category : BlueGIS Mobile Education Documents

With the WMS service, it is possible to share data over the servers as image files. Maps are shared more functionally with third-party software derived from the source and capable of responding to the service to deliver the vector or raster data on this server to the users.

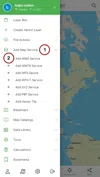
It is very easy to add WMS service in BlueGIS. There are two ways to access the WMS service panel. The first way is the 'Add WMS Service' option under the 'Add Map Service', in the left menu.

Adding WMS Service

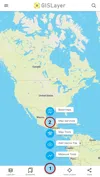
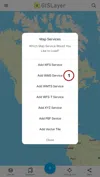
The second way is the 'Add WMS Service' option in the 'Map Services' in the quick menu (+ sign) at the bottom of the screen.

Adding WMS Service

Adding WMS Service

1. Add WMS Service Panel

Parameters to be entered when adding WMS service:

  1. Layer Name: Layer name that will appear in the layer box

  2. URL: URL address of WMS service

  3. Layer Name Used in the Service: Layer name of the WMS service

  4. Image Type: WMS service can be uploaded to the map in PNG, JPEG or GIF format

  5. Transparency: Determines the color opacity of the layer

It is mandatory to fill these five parameters.

Adding WMS Service

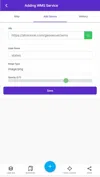
Parameters used in the example:

  1. URL: https://ahocevar.com/geoserver/wms

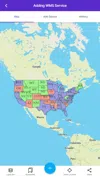
  2. Layer Name Used in Service: topp:states

  3. Image Type: image/png

  4. Transparency: 0.7

WFS service is added to the map with the 'Save' button. The result is shown below.

Adding WMS Service

2. Previous WMS Services

There are 3 main menus in the adding WMS service panel. There is a 'History' button under the third main menu. In this menu, WMS layers added to the map are saved. Thus, you can easily add a WMS layer you added before to the map without having to re-enter the parameters.

Adding WMS Service

The layer we added in the first step is now displayed in history. It is enough to scroll the box to add it back to the map. If desired, easily remove the layer from the history with the "Delete" button.

Adding WMS Service

When you press the button, the WMS layer is automatically added to the map again.

Adding WMS Service

Related Documents

Other Documents

Creating Vector Layer
Spatial Data Uploading
Upload Multiple Spatial Files
Layer Box Usage

4-Layer Box Usage

10.03.2020
Attribute Table and Features
Feature Attribute Table - Operations
Attribute Table - Text Queries And Spatial Queries
Drawing New Feature
Downloading Layer
Labels

10-Labels

10.03.2020
Z-index Replacement
Adding WFS Service
Adding WMS Service
Adding WMTS Service
Adding WFS-T Service
Adding XYZ Services
Adding PBF Service
Add Vector Tile

18-Add Vector Tile

10.03.2020
Adding Street Basemap
Adding Satellite Basemap
Adding Special Basemaps
Add Catalog

22-Add Catalog

10.03.2020
Create A Catalog File
List Catalogs

24-List Catalogs

10.03.2020
Re-Adding Previously Added Layers
Filtering With Overpass API
Creating Elevation Profile
Coordinate Tracking
Navigation

29-Navigation

10.03.2020
Application

30-Application

10.03.2020
Length Measurement
Area Measurement
Coordinate Conversion
Point Creation Using Slope And Distance
Bearing And Length Calculation
Bookmarks

36-Bookmarks

10.03.2020
Printing Out The Map
Changing The Language
Night Mode

39-Night Mode

10.03.2020
Changing Basemap
Creating Point By Clicking The Map
Height Measurement
Saving System File
Listing System Files And Adding To Map
Sharing System File
Displaying Shared Files And People
Adding Sharing File To The Map And Stop Sharing
Adding Shared File To The Map And Stop Sharing
Add, Edit, Delete Geometry in Real-Time
Sending Back System Layers Changes
Displaying Log Table
Listing Maps Shared With Everyone
Displaying Available GISMoney
Sign In

54-Sign In

10.03.2020
System Settings

55-System Settings

10.03.2020