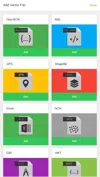
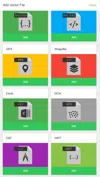
Various files can be added to the system in BlueGIS software.
- GeoJson
- KML
- KMZ
- GPX
- SHP
- Excel
- NCN
- DXF
- WKT
To reach the file upload menu, you can click the "File Upload" button from the "File Operations" option on the left menu.
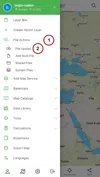
Likewise, the 'Add Vector File' option can be quickly accessed from the quick menu button (+ button) at the bottom of the screen.
Step 1: Adding Vector Files
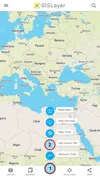
Various options appear in the Vector File Upload panel, depending on file types. You can easily upload the file to the map by selecting the type of file you want to upload.
1.1. Adding GeoJson
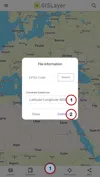
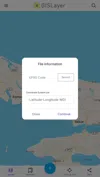
When the GeoJson option is selected, the coordinate system information of the file to be loaded is asked. After selecting the file's coordinate system from the panel that appears, click on the continue button.
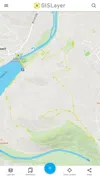
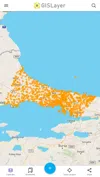
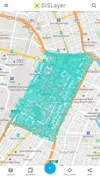
Then,the selected file is uploaded to the map and zooms into the loaded data. An example of file upload result is shown below.
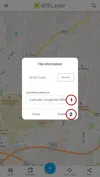
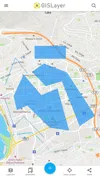
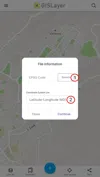
1.2. Adding KML
When the KML option is selected, the coordinate system information of the file to be loaded is asked. After selecting the file's coordinate system from the panel that appears, click on the continue button.
Then the selected file is uploaded to the map and zooms into the loaded data. An example of file upload result is shown below.
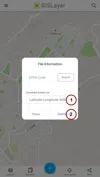
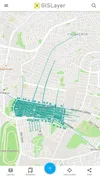
1.3. Adding GPX
When the GPX option is selected, the coordinate system information of the file to be loaded is asked. After selecting the file's coordinate system from the panel that appears, click on the continue button.
Then, the selected file is uploaded to the map and zooms into the loaded data. An example of file upload result is shown below.

1.4. Adding SHP
When the SHP option is selected, the coordinate system information of the file to be loaded is asked. After selecting the file's coordinate system from the panel that appears, click on the continue button.
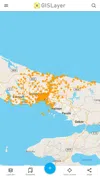
The shapefile file to be loaded should be in zip format. Then, the selected file is uploaded to the map and zooms into the loaded data. An example of file upload result is shown below.
1.5. Adding an Excel Document
When the Excel option is selected, the coordinate system information of the file to be loaded is asked. After selecting the file's coordinate system from the panel that appears, click on the continue button.
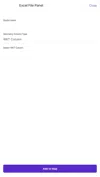
After selecting the excel file to be installed, the excel installation panel opens. The pages of the excel file are listed in the panel that opens. Select the page desired to work on.
You can add the geometries to the map in two types. As WKT or two-column information. If the WKT format will be used, the WKT Column option is selected. If you want to pull information from different columns, select the "pull information from 2 columns" option.
Then geometry columns can be selected and added to the map. A demonstration of uploading a file is shown below.
1.6. Adding NCN
When the NCN option is selected, the coordinate system information of the file to be loaded is asked. After selecting the file's coordinate system from the panel that appears, click on the continue button.
Then, the selected file is uploaded to the map and zooms into the loaded data. An example of file upload result is shown below.

1.7. Adding DXF
When the DXF option is selected, the coordinate system information of the file to be loaded is asked. After selecting the coordinate system of the file from the panel that appears, click the continue button.
Then, the selected file is uploaded to the map and zooms into the loaded data. An example of file upload result is shown below.
1.8. Adding WKT
When the WKT option is selected, the coordinate system information of the file to be uploaded is asked. After selecting the coordinate system of the file from the panel that appears, click the continue button.

Then, the selected file is uploaded to the map and zooms into the loaded data. An example of file upload result is shown below.


Related Documents